User Manual
1. Welcome
Thank you for choosing Blentity (also known as SAMURAI Key in Japan). Blentity is designed to provide high-strength, comprehensive protection for personal data, whether it's data stored on your computer, offline data on USB drives, or securing your account logins for frequently used services. Blentity ensures thorough protection in all cases.
Hardware-level encryption and key protection for data security
Traditional encryption software often stores encryption keys in unsecured environments, making all encrypted data vulnerable if the key is compromised, rendering encryption ineffective. Blentity, however, uses a CCEAL5+ high-standard security chip specifically designed to protect your encryption keys. This ensures that even in the face of physical tampering or side-channel attacks, your keys remain secure, keeping your data safe at all times.
Loss of hardware is no longer a threat
To address concerns over the misuse or loss of physical keys, Blentity employs a PIN protection mechanism. After 8 consecutive incorrect PIN entries, the device will automatically lock, preventing brute-force attacks. Additionally, with the mnemonic recovery mechanism, you can easily restore your encrypted data on any Blentity device, ensuring that your data is never lost.
Enhance login security and user experience across everyday services
Blentity can also serve as a physical security key for two-factor authentication, supporting hundreds of websites such as Google, Microsoft, Facebook, Dropbox, X (formerly Twitter), and Github (with a limit of 25 websites per key). This reduces the risks of password leaks from social engineering or phishing attacks. For websites that support passwordless protocols, Blentity also provides a seamless password-free login experience.
This document provides detailed usage instructions for the product. Before using Blentity, please read this document (please check for the latest version at https://wisecure-tech.jp/samurai_key/support) and the Terms of Use thoroughly to ensure proper and safe usage.
Disclaimer
The contents of this document may change without prior notice. The most current version can always be found at https://wisecure-tech.jp/samurai_key/support. For updates or corrections, please consult this link. Should you identify any errors in this document, we encourage you to contact our support center.
Blentity and SAMURAI Key are trademarks of WiSECURE Technologies Corporation. Other company and product names mentioned here may be trademarks or registered trademarks of their respective owners.
Please note that the illustrations in this document may not exactly match the actual product. We continuously strive to improve our products, which may result in changes to their specifications without notice.
To improve the product, specifications may be changed without prior notice.
WiSECURE is not liable for damages resulting from improper use of Blentity, non-compliance with instructions in this guide, or repairs and modifications performed by unauthorized third parties.
This product adheres to the FIDO standard and functions as an authenticator for passwordless and multifactor authentication. Its compatibility with various services following the FIDO standard may differ and is subject to change.
Be aware that if you forget your PIN and Passphrase, access to stored data will be impossible. WiSECURE does not offer data recovery services, so we strongly recommend backing up important data regularly.
WiSECURE cannot assure the uninterrupted or error-free operation of Blentity. Users bear the risk of non-compliance with product instructions or using the product with incompatible devices.
As Blentity does not connect to WiSECURE's device network, WiSECURE is unable to access or decrypt data encrypted or stored with this product, including authentication keys. Consequently, WiSECURE bears no responsibility for user actions with Blentity or any loss or damage of data.
2. Quick Setup
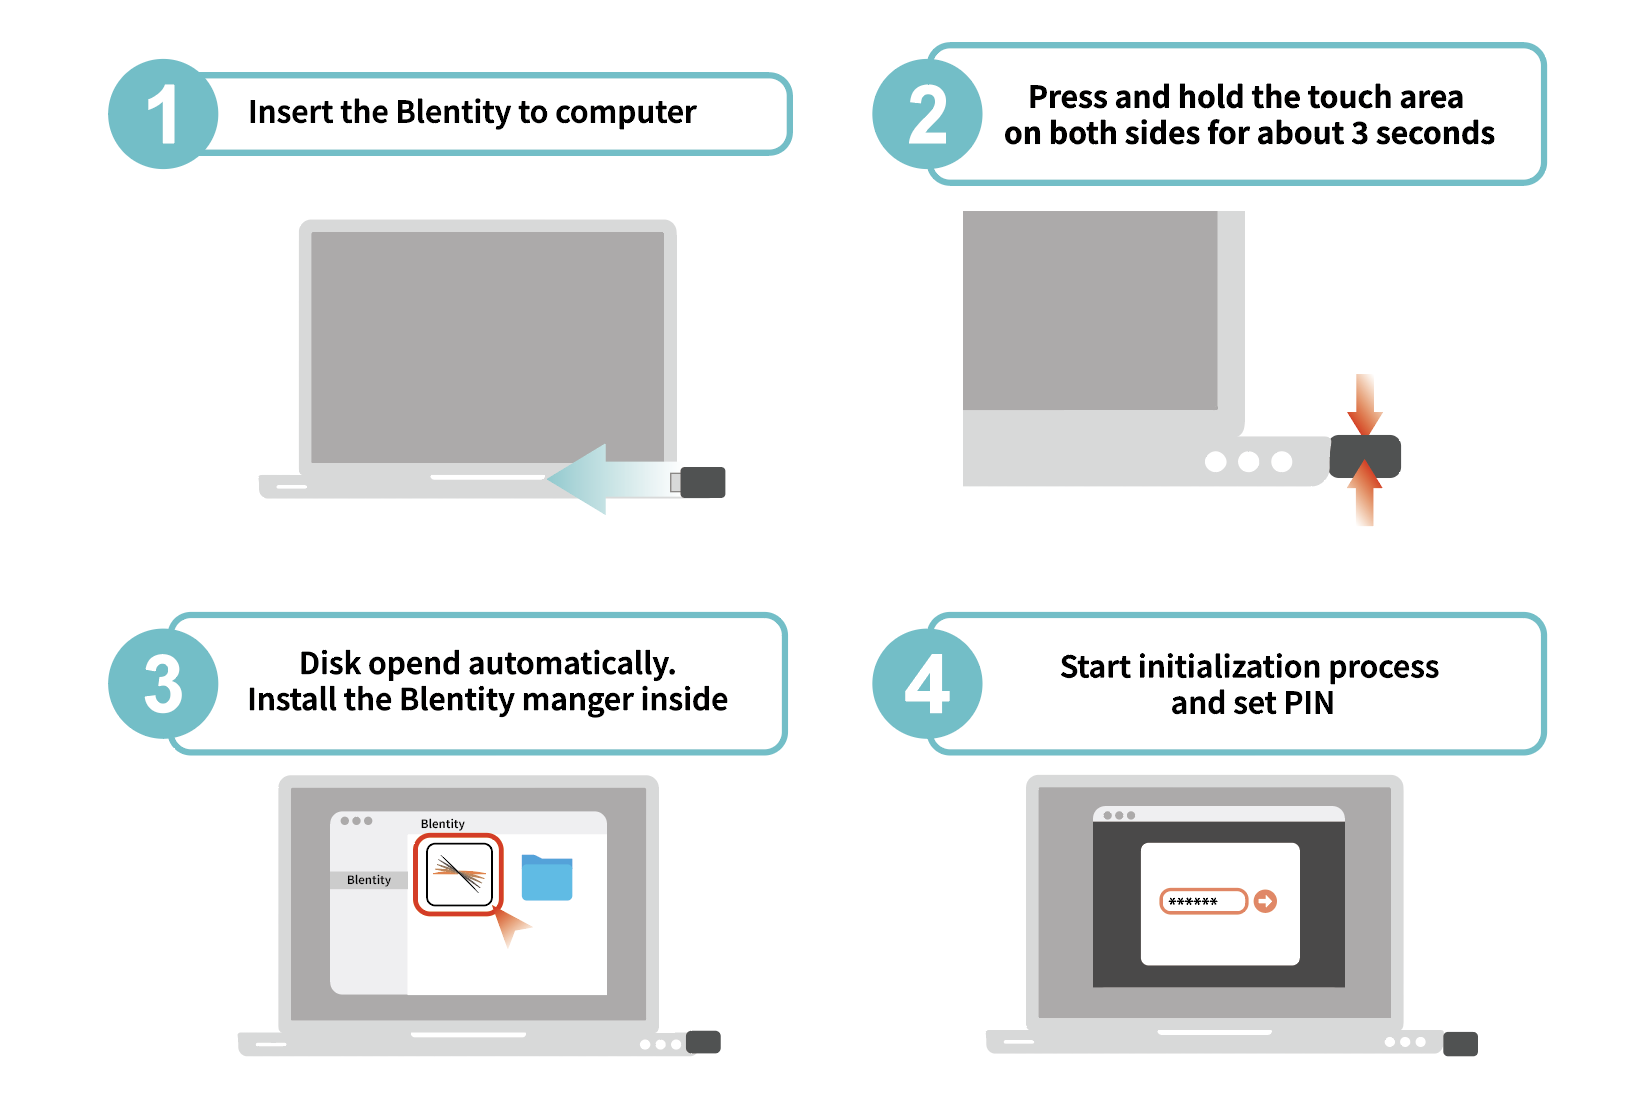
For first-time use, please install the management tool to perform a quick setup. After setup, you will have a PIN and a recovery phrase, and you can use the authentication, data encryption, and encrypted flash drive functions.
Insert Blentity into your computer's USB port. Make sure the hardware switch at the end of Blentity is turned on (display orange).
Press and hold the touch-sensitive areas on both sides of Blentity for about 3 seconds, after which the system volume will appear in the directory.
Click on and open the management program Blentity Manager in the installation volume, and follow the guide to create a PIN and recovery phrase.
The installation file path is as follows
manOS Blentity/Mac/Blentity Manager Installer.pkg
Windows Blentity/Windows/Blentity Manager Installer.exe
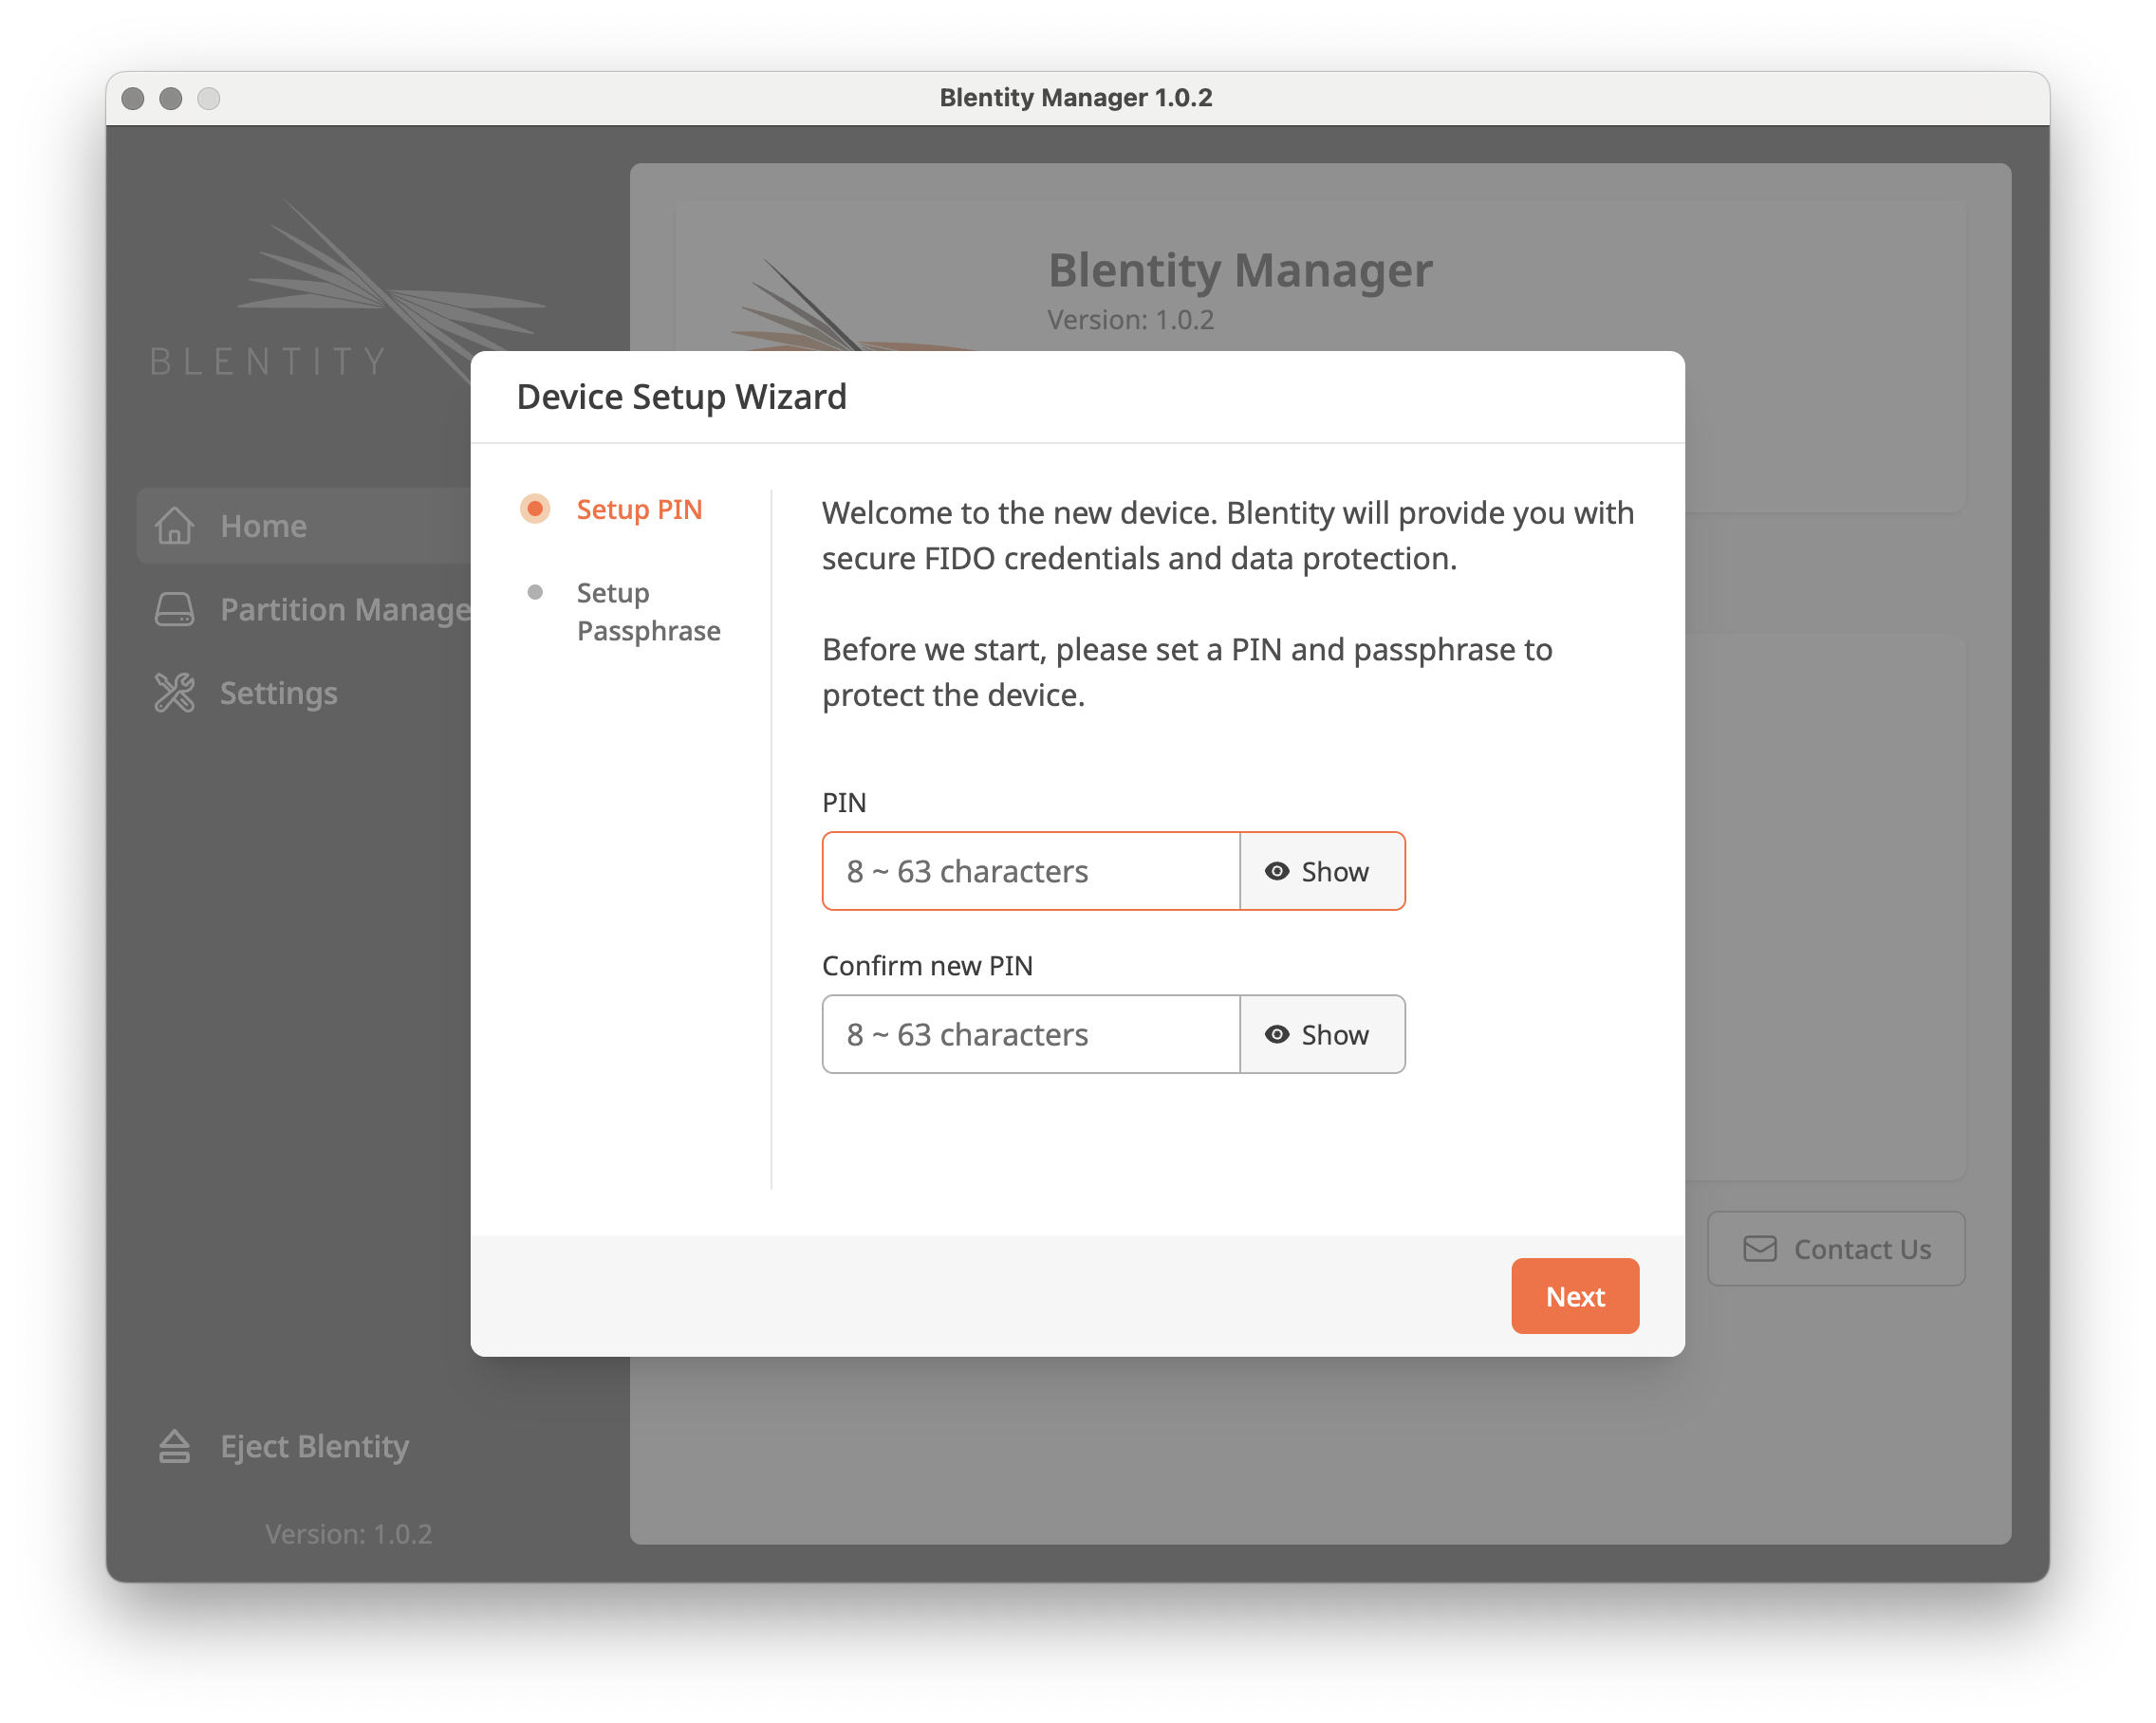
PIN Protection Mechanism
PIN is this product's protection mechanism. Even if the device is lost or stolen, it cannot be used without the PIN.
After 8 consecutive incorrect PIN entries, the device will automatically lock to prevent brute-force attacks.
You can change the PIN at any time through Blentity Manager.
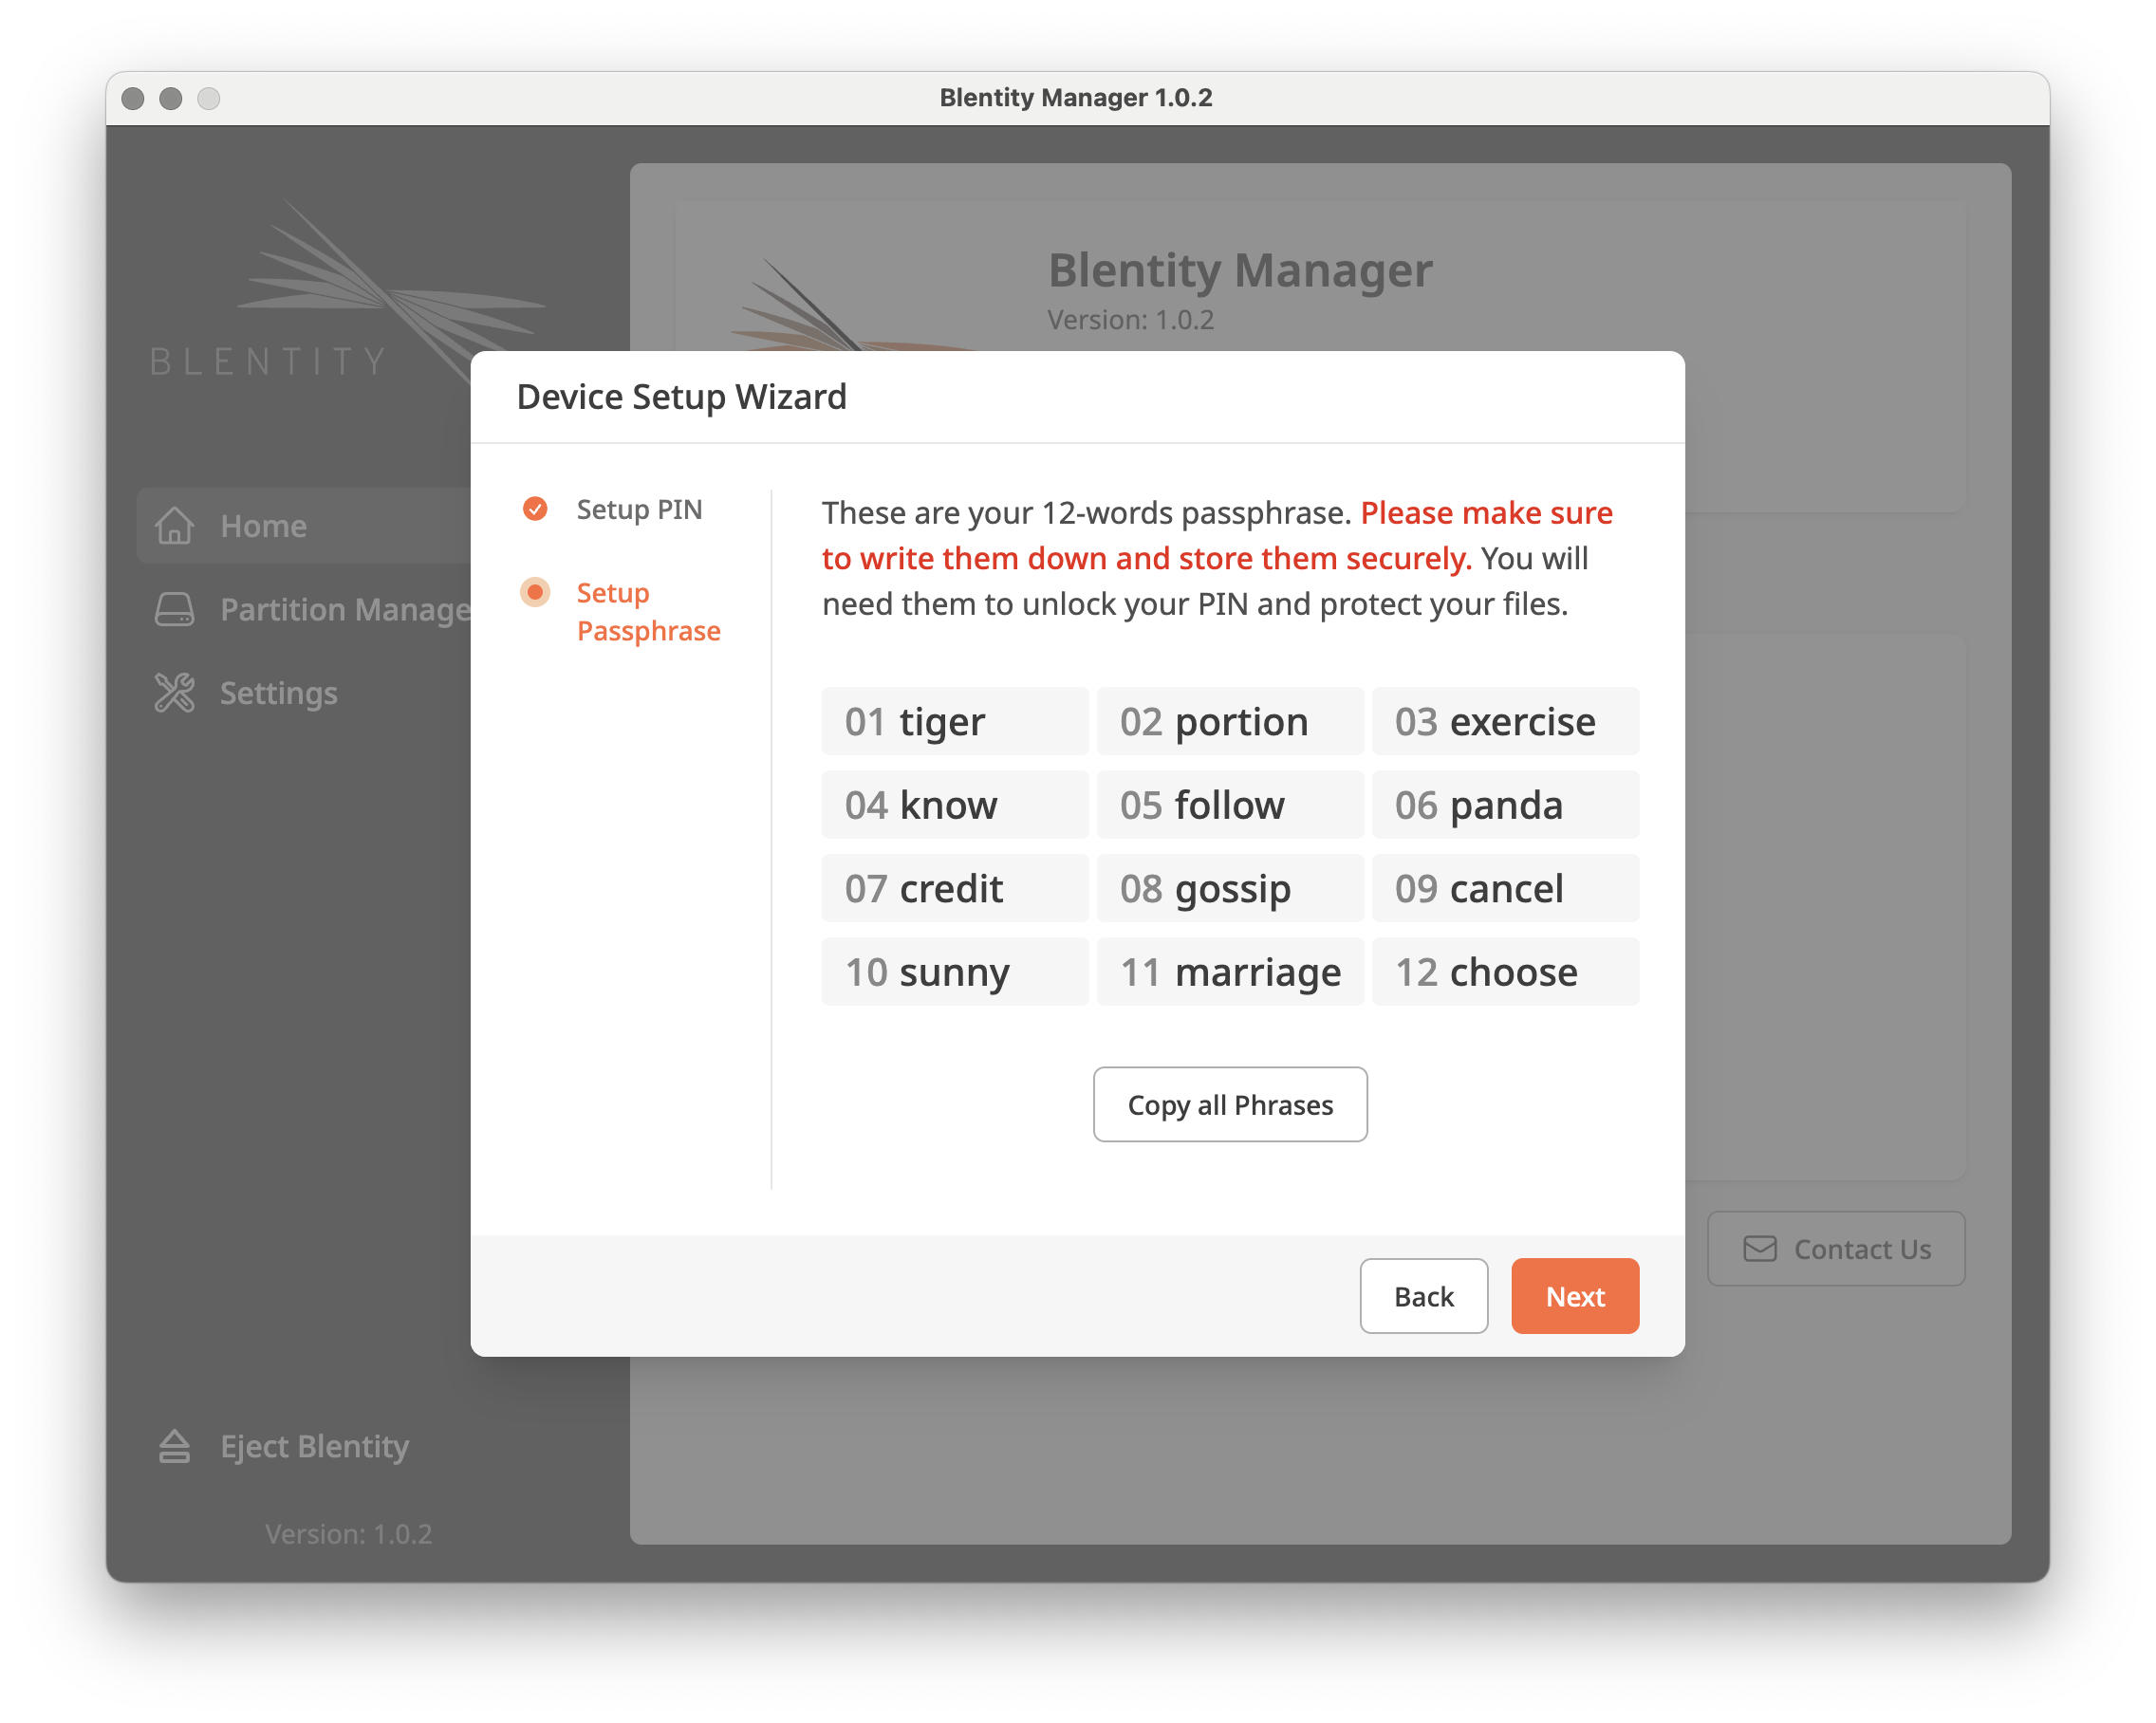
Passphrase Recovery Mechanism
The Passphrase is a randomly generated set of 12 English words, used for unlocking a locked PIN and secure device recovery
Please be sure to memorize or securely store the recovery phrase (a writable card is included in the product packaging).
If an incorrect recovery phrase is entered 8 consecutive times, the device will forcibly reset to factory settings, and all data will be deleted.
References for the Setup Process
please create a PIN.
2. After creating a PIN, click on the next step, where you can choose to obtain a new Passphrase or use a previously backed-up Passphrase.
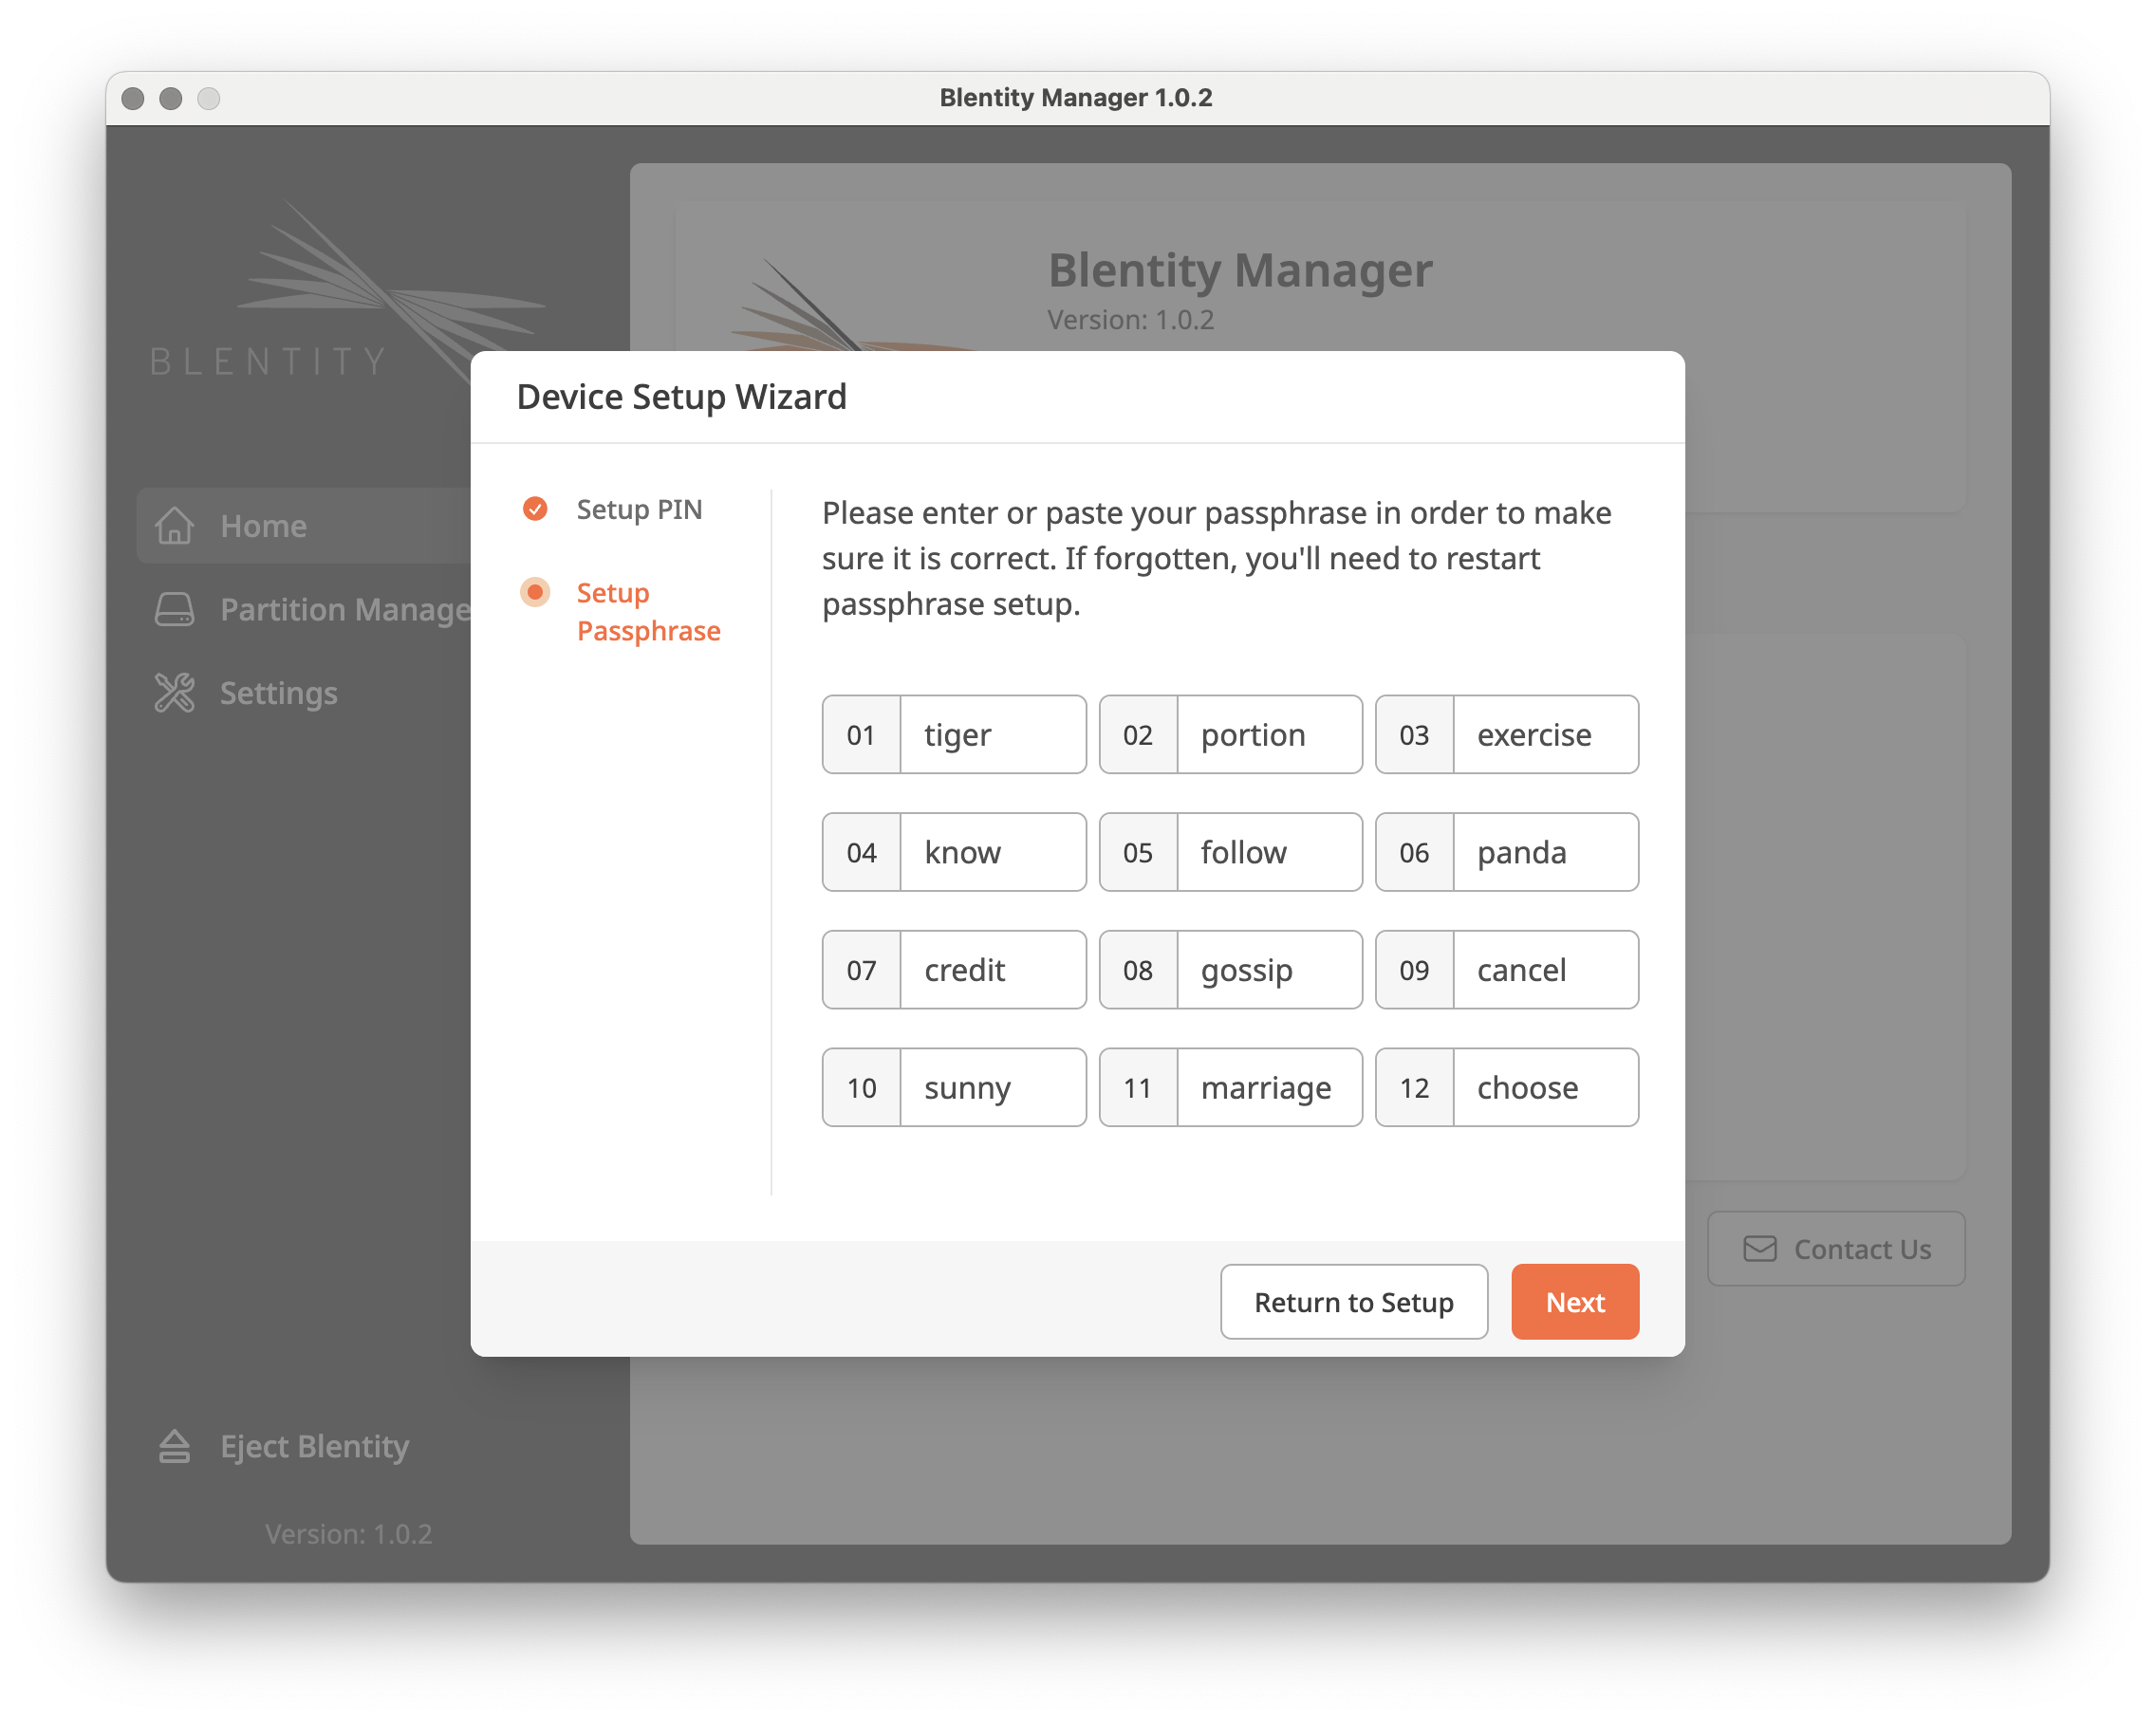
3. After choosing to obtain a new Passphrase, a 12-word Passphrase will be automatically generated. Remember to copy or write this down and keep it in a safe place. On the next page, you will need to enter the Passphrase in the correct order to confirm; you can also copy and paste it directly from this page.
4. On this confirmation page, paste or enter the Passphrase and click on the next step to generate the keys. Once the keys are generated, the initialization process is complete.
3. Computer File Encryption Function(File Encryptor)
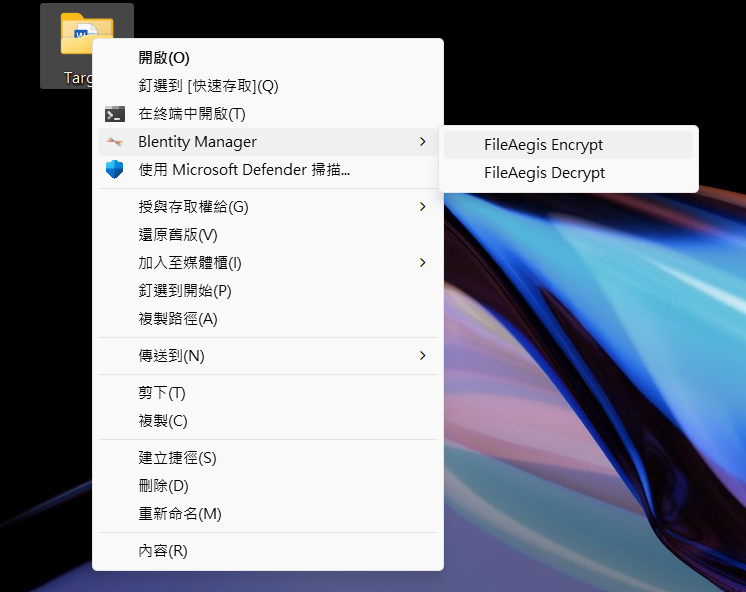
File Encrypt
You can right-click on any file or folder and select 'Encrypt'.
After encryption, the file will automatically have a .btf extension added and will be saved in the default path:~/Documents/Blentity File Encryptor.
If this function is not available after initializing the product, please refer to the right-click menu settings to configure the relevant settings.
File Decrypt
You can decrypt Blentity encrypted files with the .btf file extension. Once completed, the decrypted file will be saved in the same path as the original encrypted file.
Related FAQ
How Does Blentity Protects My Files ?
If the Device Is Lost, Is There Still a Way to Decrypt My Encrypted Files on the Computer?
4. Secure Partition Function
This product provides a hardware-based encrypted volume (AES-256 XTS), suitable for protecting sensitive data, which can only be opened after PIN verification. If you need a plaintext volume function, please refer to the Partition Setup for capacity allocation.
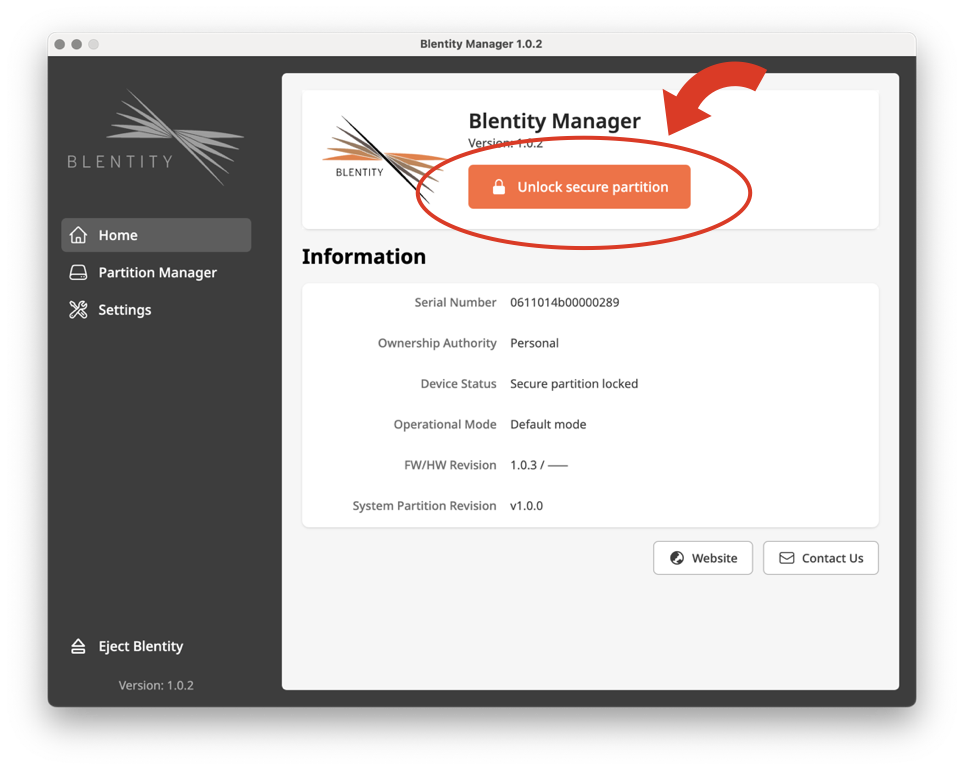
Open Secure Partition
Launch Blentity Manager。
Click 「Unlock secure partition」。
Enter PIN to successfully open the secure partition.

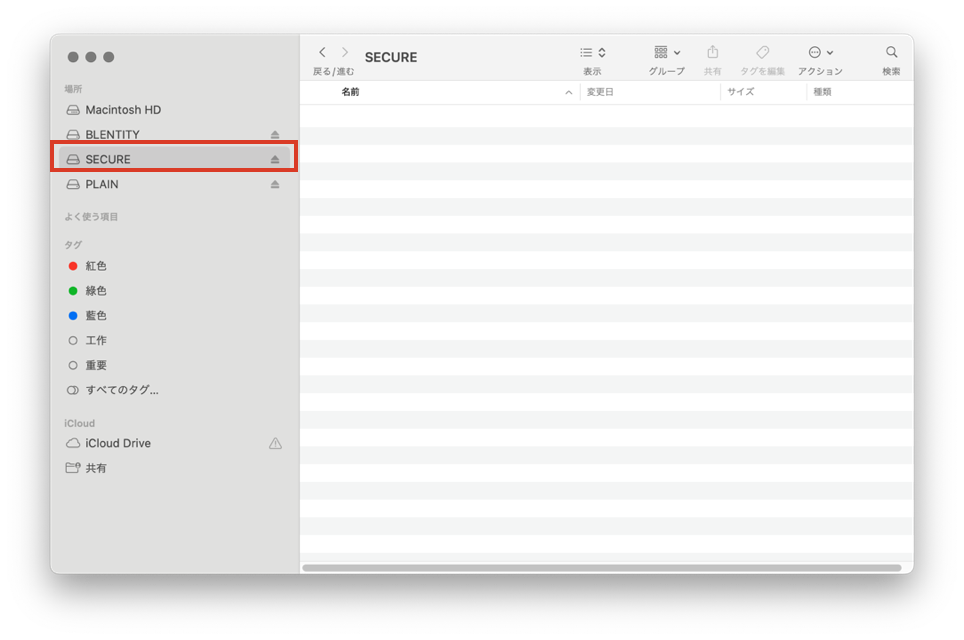
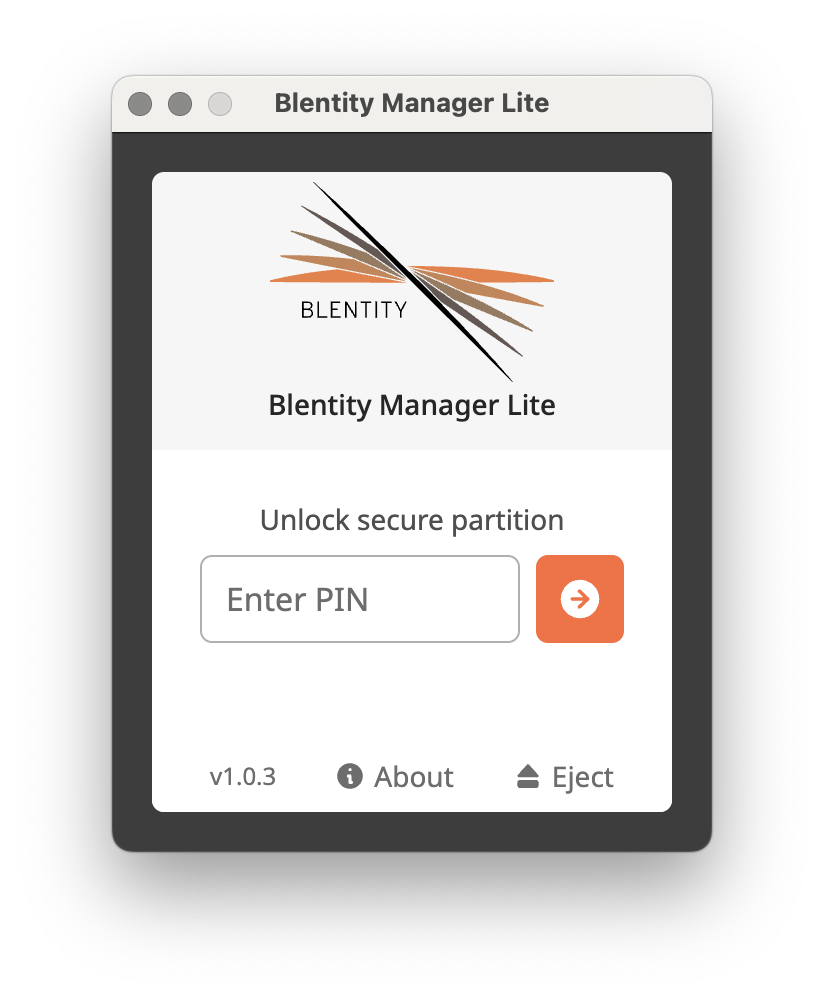
Additionally, you can open the secure partition through a portable, lightweight program in the system partition.
Open the system disk partition.
Launch Blentity Manager Lite.
Enter the PIN to successfully unlock the encrypted disk partition.
Related FAQ
How Does Blentity Protects My Files ?
If the Device Is Lost, Is There a Way to Recover My Encrypted Files Stored on Blentity?
5. Multifactors and Passwordless Authentication
The authentication services provided by this product require the following FIDO2-supported browsers: Microsoft Edge, Mozilla Firefox, Google Chrome, and Apple Safari. For the latest supported list, please visit the FIDO Alliance official website.
Recommended Execution Environment:
Linux | Firefox |
macOS | Safari |
Windows | Chrome, Edge |
Before using the FIDO authentication function, please complete the initialization process. See Quick setup.
After registering and binding the security key, you can sign in more securely using the designated PIN and physical security key. Please refer to the operating instructions for various services that support FIDO2.
Example: To add a security key as a sign-in method for your Microsoft account
Go to the Microsoft account page and sign in normally.
Select [Security] > [More security options].
Select [Add a new way] to sign in or verify.
Select [Use a security key].
Identify the key type [USB] and select [Next].
You will be redirected to the setup experience, where you will insert or tap your Blentity.
Enter an existing PIN (if you haven’t created one, please initial your device by Blentity Manager first).
Touch the touch area of Blentity.
Name your Blentity so that you can distinguish it from other keys.
Sign out and open Microsoft Edge, select Use Windows Hello or security key instead, and sign in by inserting or tapping your key.
To learn more about managing and deleting a security key on Microsoft, please visit the Microsoft official support site.
Related FAQ
How Does Blentity Protects My Accounts?
If the Device Is Lost, Is There Still a Way to Log Into My Bound Services?
6. Blentity Manager
6-1. Backup and Restore
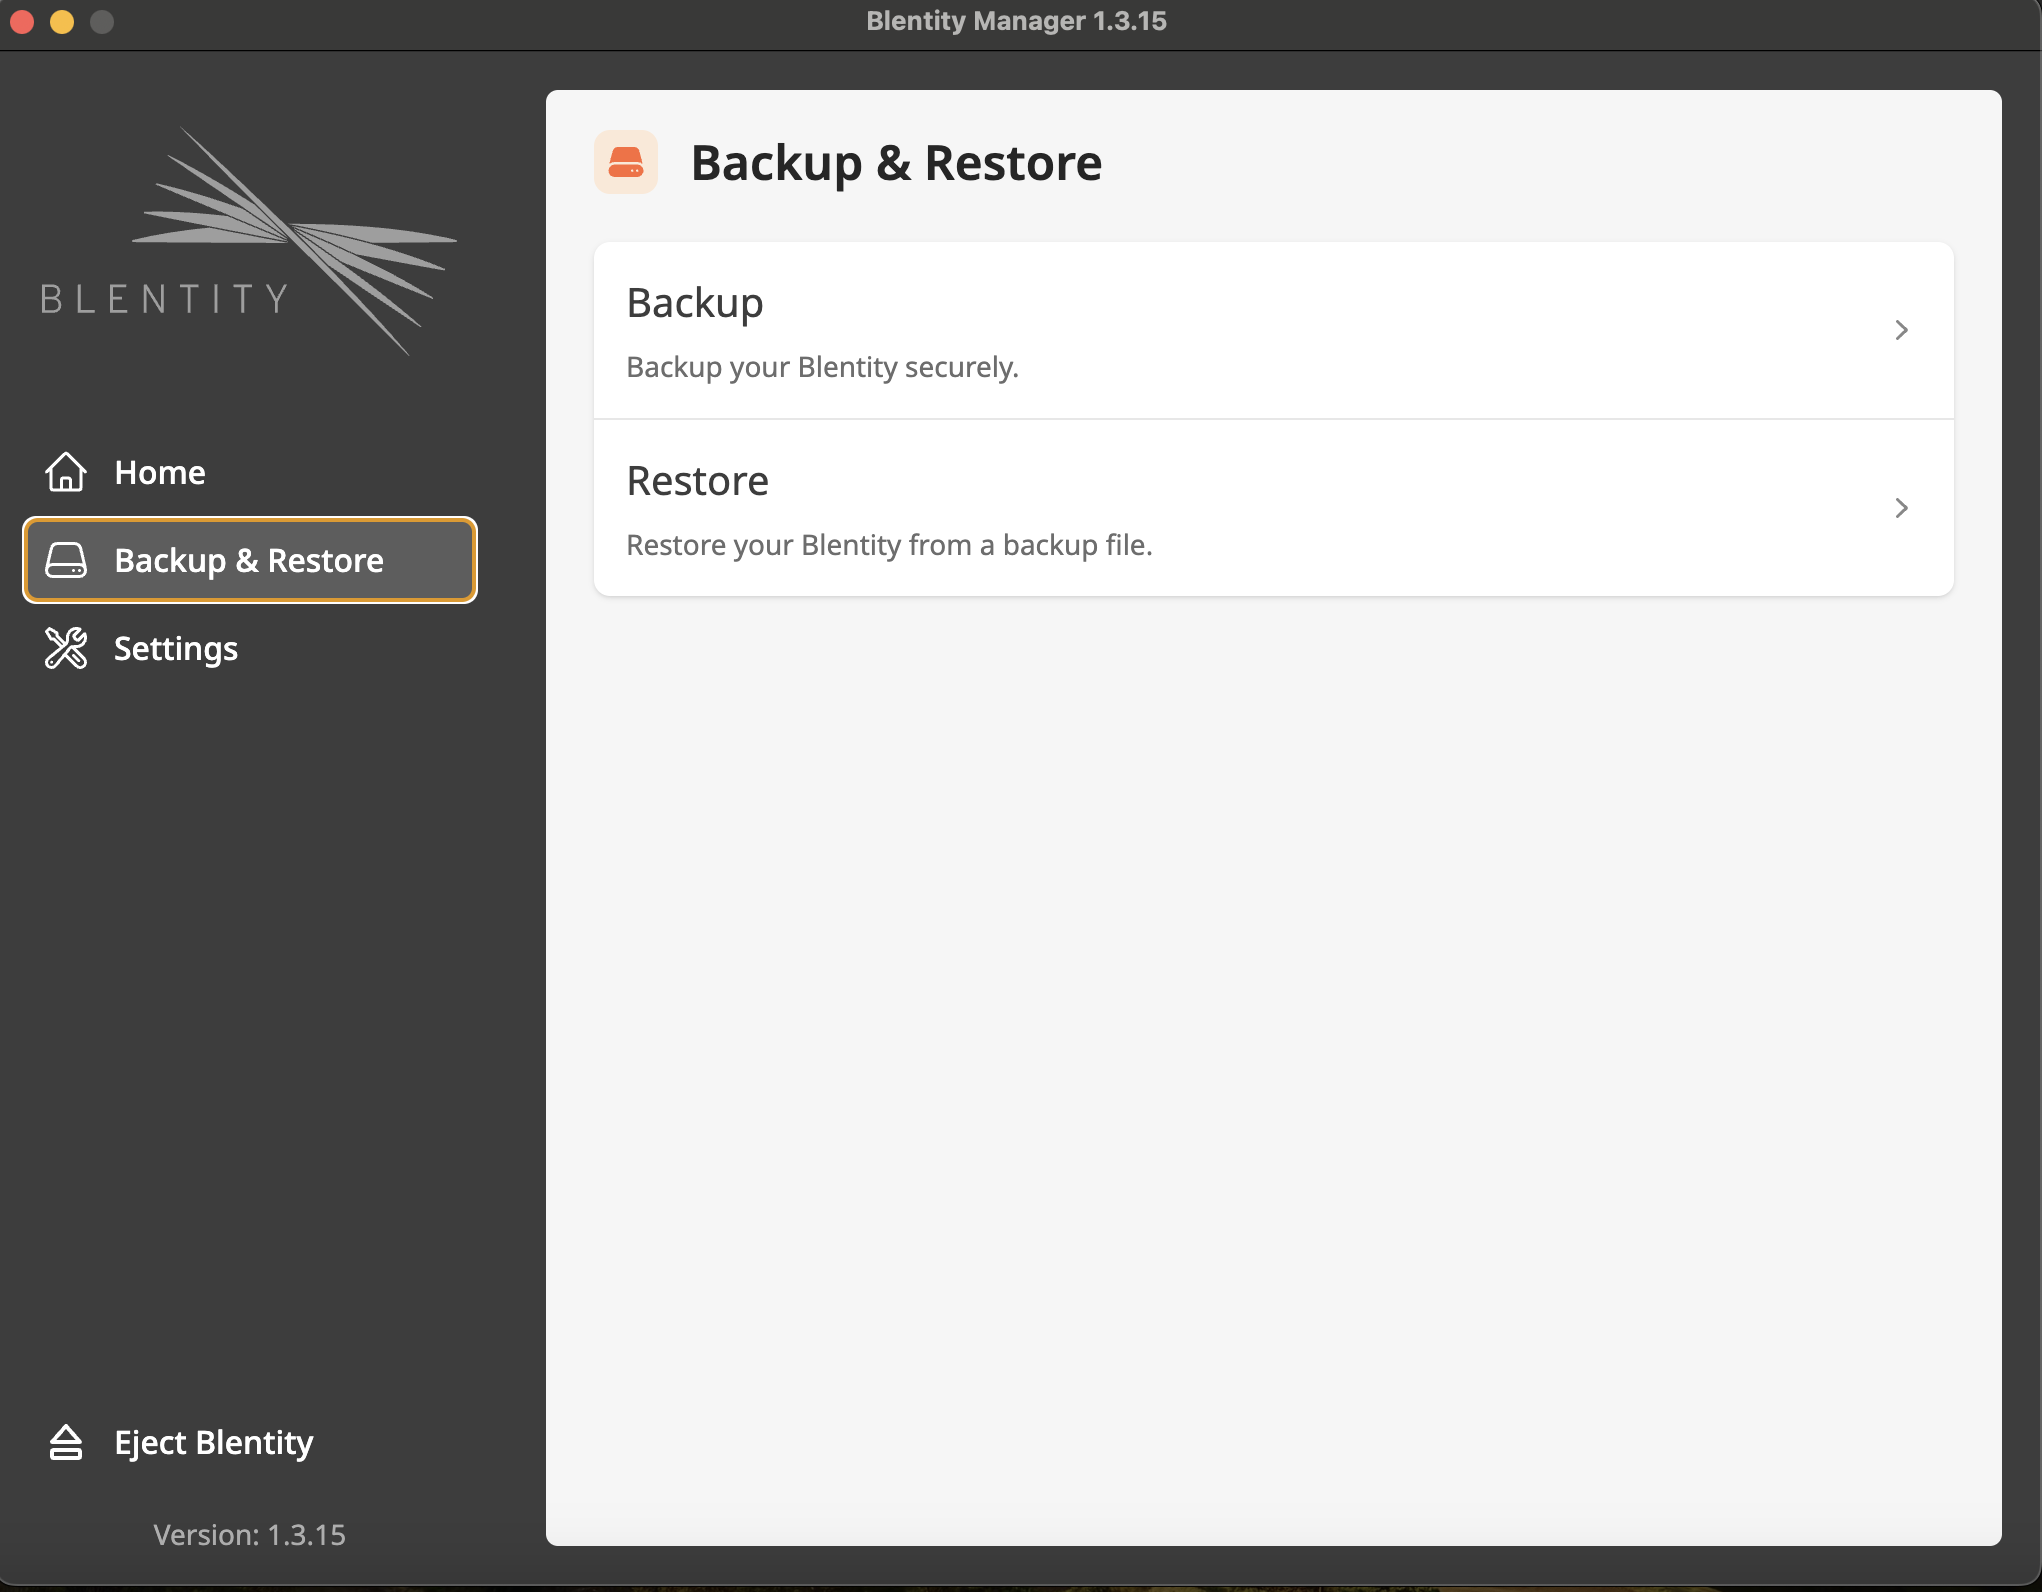
This product's backup and restore function can safely back up and restore your encrypted disk volume files and related settings
Backup Steps
In the Blentity Manager menu, select 'Backup and Restore > Backup'
keying the passphrase
Select the storage location for the backup file
The encrypted backup file has been successfully exported. The backup file name is
<original filename>_BlentityBackup.bzb
Restore Steps
In the Blentity Manager menu, select 'Backup and Restore > Restore'
The Blentity used for file restoration will first be reset to factory settings and cleared. All data in the disk volume will be deleted. Please make sure important data has been backed up elsewhere. FIDO services that have been bound will also need to be re-bound.
Choose the backup file
<filename>_BlentityBackup.bzbkey the corresponding passphrase to this backup file
Your backup file and related settings have been successfully restored. (If plaintext is configured, reformatting will be necessary)
6-2. Change PIN
In the Blentity Manager menu, select「Settings > Change PIN」。
After entering the existing PIN, you can set a new PIN.
Do not use any third-party tools other than Blentity Manager to change the PIN. Doing so will result in a PIN lock, and you will need to use Blentity Manager to input the mnemonic phrase in order to reset the PIN and use this product again.
6-3. Forgot PIN
In the Blentity Manager menu, select「Settings > Forgot PIN」。
Enter your passphrase to verify your identity.
Follow the prompts to set a new PIN.
6-4. Partition Setup
Choose "Partition Management > Partition Setup" in Blentity Manager
This operation will erase all data within the partition, which is irreversible. Be sure to back up your data beforehand.
Instructions:
If a warning appears about the disk being unreadable, choose [Ignore].
Follow the system prompts to enter the administrator password for the computer.
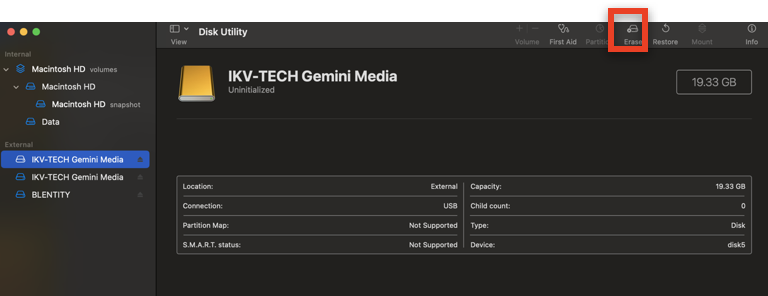
Once the Partition Setup is complete, follow open the partitions first. Finally, click open disk utility button. It will lead you to disk utility in OS.
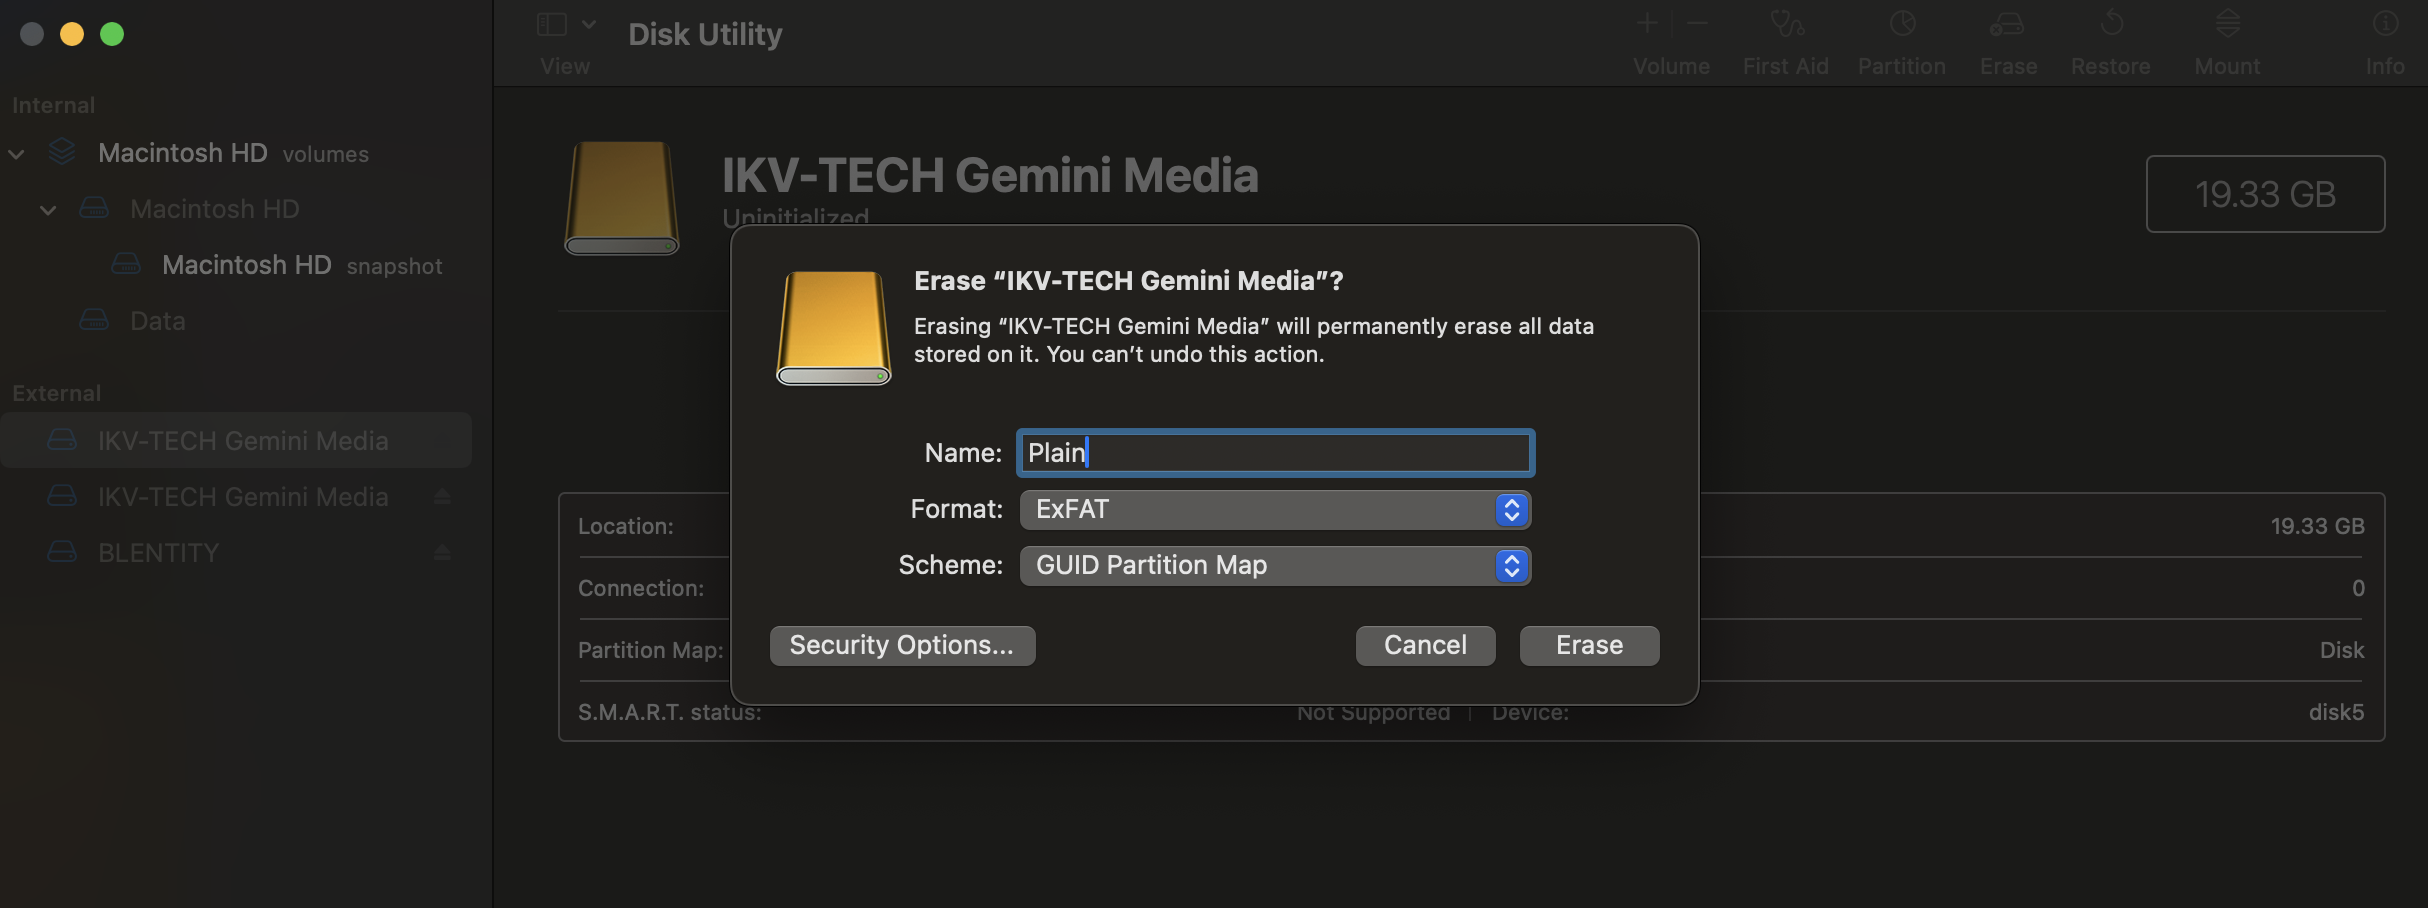
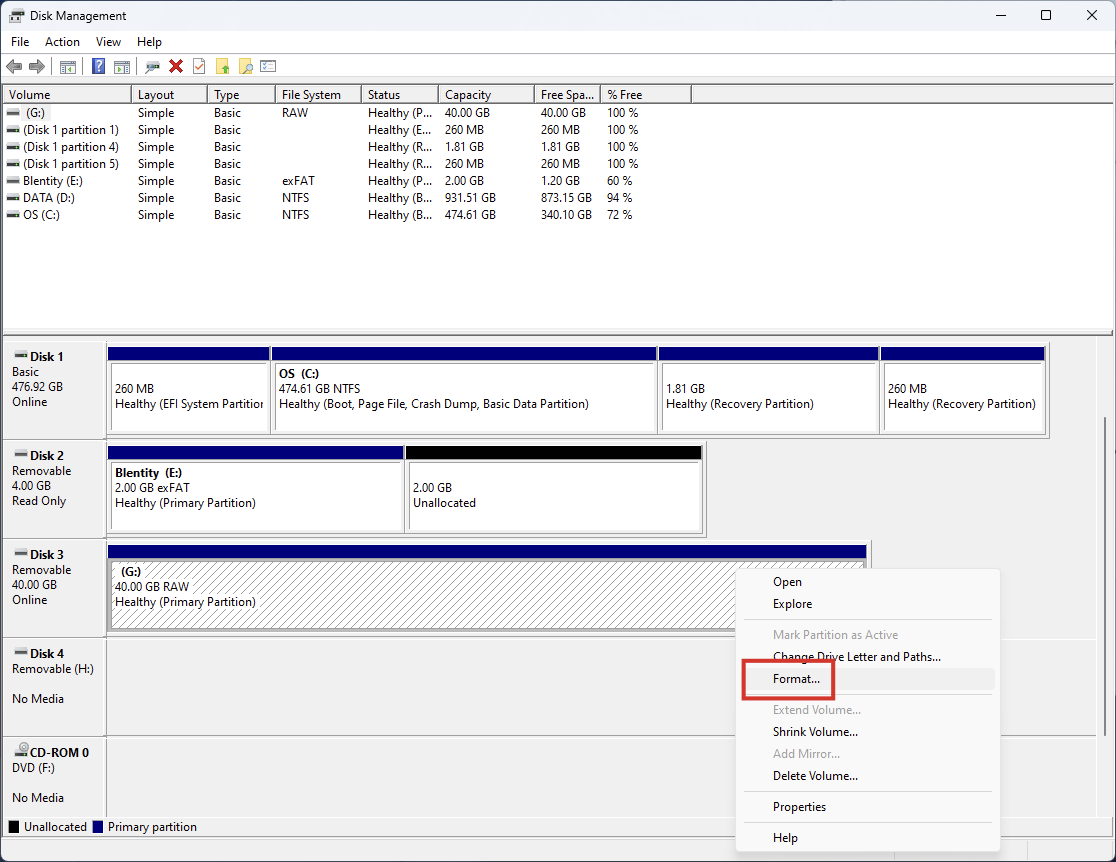
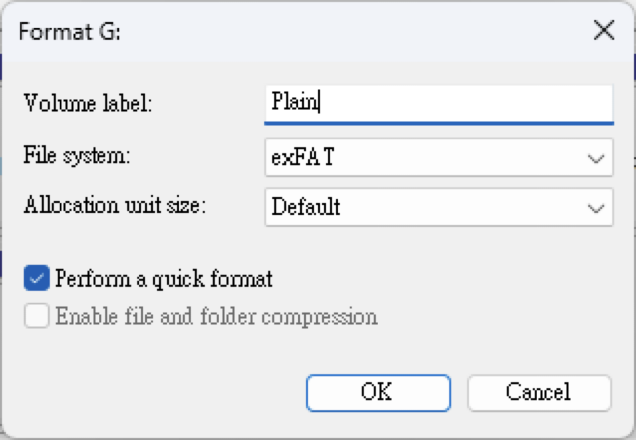
In disk utility, Right click to the partition and choose format.
Rename the partitions and choose the file system. This product only support exFat.
MacOS
Windows
6-5. Operation Mode Setup
You can control how disk on your device are opened through different "Operation Modes".
After selecting "Settings > Operation Mode Settings" in the Blentity Manager menu, you can choose from the following modes:
Default Mode:The most confidential mode. All volumes are hidden by default. To open them, you need to turn on the hardware switch and manually long-press the sensor area. This mode is suitable for situations requiring a high level of data protection.
System-only Mode:After the device is connected, only the "System Partition" will automatically open. This is suitable for those who regularly need to manage the device.
Easy Mode:In this mode, all partitions except the secure partition will automatically open when the device is connected. This provides maximum convenience and is suitable for situations where non-sensitive data is frequently used.
The ways to open each disk partition in different modes:
Secure Partition | System Partition(RO) | Plaintext Partition(RW) | |
|---|---|---|---|
Default Mode | Management tool verification opened | Manually Open* | Manually Open* |
System-only Mode | Management tool verification opened | Automatically Open* | - |
Easy Mode | Management tool verification opened | Automatically Open* | Automatically Open* |
*Means the bottom slide switch must be on(Display Orange),If the switch is turned off, then that disk volume will be completely unable to open.
RW:Read / Write
RO:Read Only
After switching the above modes, you need to unplug and replug the device for the changes to take effect.
6-6. Right-click Menu Settings
To use the File Encryptor function, you need to enable the right-click menu settings. In the management tool menu, select "Settings > Context Menu Setup" to enter the settings page.
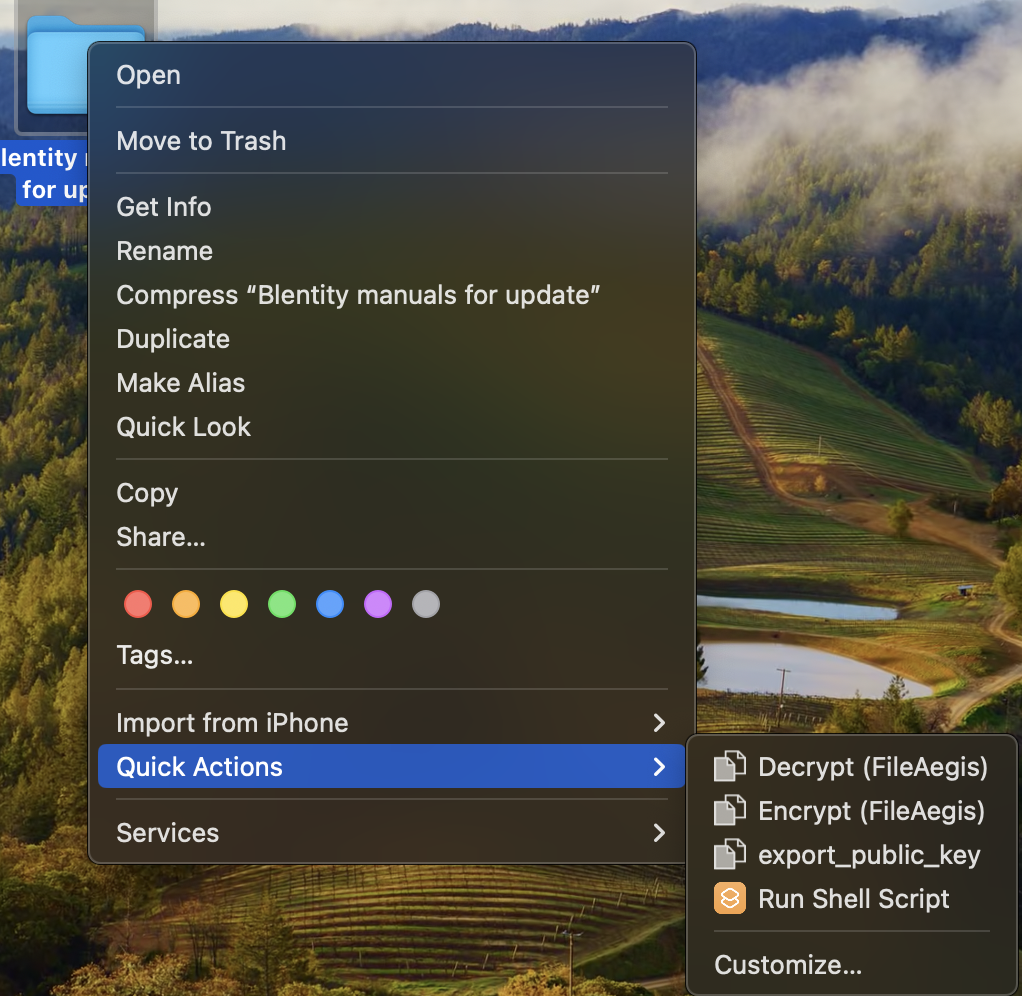
MacOS users please note
To display the File Encryptor option in the right-click menu of Finder, you need to enable the File Encryptor extension on your Mac:
Go to "System Settings"
Click on "Privacy & Security"
Select "Extensions"
Check the boxes for "Encrypt (FileAegis)" and "Decrypt (FileAegis)"
Once you've completed these settings, you'll be able to use the File Encryptor function in Finder's right-click menu.
6-7. Language Setup
The product offers interfaces in Chinese, English, and Japanese. Adjust this in "Settings > Language Setup".
6-8. Factory Reset
This function will reset the product to its factory uninitialized state. Perform this operation under "Settings > Factory Reset”.
This operation will clear PIN, Passphrase, all credentials, authentication information, and data, and cannot be reversed. Please be sure to back up your data beforehand.
6-9. Update
To ensure that this product always provides the best quality and user experience, you can update the software and firmware by selecting 'Settings > Program Update' through the management tool. Please make sure your network connection is working properly.。
This operation may clear all data within the partition and cannot be reversed. Make sure to back up your data beforehand
Appendix A :FAQ
Q: How Does Blentity Protects My Files?
Blentity provides secure encrypted storage space and file encryption functionality through built-in hardware encryption technology. Its embedded CCEAL5+ security chip specifically protects encryption keys, avoiding storing keys in insecure computers as with software encryption. Even if subjected to physical intrusion or side-channel attacks, the chip can still effectively defend against them, ensuring the safety of your files
Q: How Does Blentity Protects My Account?
Blentity uses FIDO security key technology, ensuring through asymmetric encryption that only those possessing the hardware key can authenticate their identity. Even if the password is leaked, attackers cannot log into your account, effectively preventing phishing attacks and password theft, providing the highest level of security protection for your account.
Q:What Are the Risks If I Lost My Blentity?
Blentity uses a PIN code protection mechanism, and after 8 consecutive incorrect PIN entries, the device will automatically lock to prevent brute force attacks. You don't need to worry about others misusing your device. Additionally, Blentity provides a recovery phrase mechanism, allowing you to easily restore your data on any Blentity device, ensuring that your data won't be lost. Please be sure to store your recovery phrase securely and regularly back up your encrypted data.
Q: If the Device Is Lost, Is There a Way to Recover My Encrypted Files Stored on Blentity?
Yes, as long as you've previously used the backup function to export encrypted files, you can use that device's recovery phrase to import and restore your encrypted files on another Blentity device."
Q: If the Device Is Lost, Is There a Way to Decrypt My Encrypted Files on the Computer?
Yes, you can use that device's recovery phrase to restore your keys on another Blentity device. You can then use that Blentity to decrypt the originally encrypted files.
Q: If the Device Is Lost, Is There Still a Way to Log Into My Bound Services?
It depends on the support status of the services. Services that support FIDO usually provide their own account recovery processes. For example, some services may allow you to log back into your account using a backup security key or other identity verification processes. Please refer to the official instructions of the services you have bound to understand the specific account recovery steps.
Q: Can I change the PIN?
Yes, you can change the PIN in [settings > change PIN] without affecting stored data.
Q: What If the PIN Gets Locked?
If an incorrect PIN is entered 8 times, or if the PIN is changed using a management tool not specific to this product, the PIN will automatically lock. At this time, the status LED will show a solid red light. Please open Blentity Manager and use the recovery phrase to unlock and reset the PIN.
Q: What should I do if I forget my PIN?
If you forget the PIN, you can unlock it using the 12-word Passphrase generated during initialization. If the Passphrase is also lost, data loss will result, so it's very important to back up data regularly and store the Passphrase securely.
Q: In What Situations Would the Recovery Phrase Be Used?
Unlocking a Locked PIN
When the number of incorrect PIN entries exceeds the limit, or when the PIN is changed using a third-party tool other than Blentity Manager, the PIN will be locked. In this case, you need to enter this recovery phrase in Blentity Manager to unlock and reset the PIN.
Restoring Keys and Backup Files
If you lose your device, you can use this recovery phrase to restore your device on a new one. This feature allows you to easily recover your encrypted backup files and File Encryptor encryption keys on other devices.
Q: What Should I Do If I Forget the Recovery Phrase?
Losing the recovery phrase will result in the inability to restore backup data in the future. Therefore, please be sure to keep the recovery phrase in a safe place. If you forget or lose the recovery phrase, it is strongly recommended that you first back up your data, then restore factory settings to re-establish and save a new recovery phrase. This prevents a situation where you can't unlock the device if the PIN gets locked, which would force a factory reset and result in data deletion."
Q: Does the Blentity Used for Data Restoration Have to Be Brand New?"
You can restore your encrypted backup files and related disk volume settings on any Blentity device using the recovery phrase. However, please note that the Blentity will first be reset to factory settings, and its internal data will be cleared. Be sure to back up any important data separately. Additionally, authentication services previously bound to that Blentity will no longer be accessible and will need to be re-bound. Therefore, it is recommended to perform the restoration on a new Blentity
Q: Is mobile device support, Windows Server, or Linux OS available?
These operating systems are not within our support range. If you use this product with these systems, you do so at your own risk. For supported operating systems and browsers, please refer to "Appendix B:Specifications and Supported Environments"
Q: Is software installation required?
The full-featured management tool must be installed for initialization. After initialization, the secure partition can be accessed through the Blentity Manager Lite. The product can be used on computers where the tool is not installed.
Q: Why is the number set different from the number displayed?
The disk space set may be "larger" than the space displayed on the security partition. This is because 1GB equals 1024MB, and if your set value is not divisible by 1024, this remainder will not be accounted for during the setting but will eventually be allocated to the secure partition. Therefore, the secure partition will be larger than the set value after configuration.
Q: Is it a concern that Blentity is categorized as Passkeys in certain browsers when utilized as a sign-in method for a Google account?
When registering Blentity on Edge and Chrome, it is identified as Passkeys, while on Firefox, it is recognized as a FIDO2 security key. However, you can successfully sign in regardless of the browser used for registration. User experience remains consistent across all platforms.
Appendix B:Specifications and Supported Environments
Main Unit Specifications
Product Name | Blentity Data protector with FIDO2(SAMURAI Key) |
Compliance | FIDO2 Level 2, VCCI, CE, FCC |
Interface | USB 3.2 Gen1 |
USB Connector Shape | Type C |
Read/Write Speed (Maximum) | Read: 140MB/s Write: 45MB/s |
Capacity | 128GB |
Format Type | exFAT |
Encryption Algorithm | Hardware-based AES XTS 256 |
Case Material | Plastic |
External Dimensions | 76 x 20.5 x 10 mm |
Weight | 13.6g |
Adapter Specifications
Interface | USB 3.2 Gen1 |
Input Shape | Type C |
Output Shape | Type A |
Case Material | Plastic |
External Dimensions | 37.5 x 20.5 x 10 mm |
Weight | 5.6g |
※ Part of the storage capacity of this product is allocated for system use; therefore, the advertised storage capacity does not reflect the total usable space available to the user.
※ The stated maximum transfer speed is based on tests conducted in our company's controlled environment. Actual speeds may vary depending on your specific setup and operating conditions.
※ Please note that both the specifications and the physical appearance of the product are subject to change without prior notification.
Partitions and Management Tool Execution Environment:
Recommended Computer Specifications
Computers with USB 3.0 interfaces
Minimum 8GB of RAM
Supported Operating Systems
Windows | Windows 10 (ver 21H2) and later |
macOS | Ventura and later |
Operations via USB 3.0 cards or USB hubs are not guaranteed.
Please use the latest version of each host controller driver.
Windows RT, Starter Edition, Embedded, and Mobile are not supported.
Due to the nature of the product, we cannot guarantee operation in all environments and device combinations.
FIDO Authentication Function Execution Environment
The authentication services provided by this product require the following FIDO2-supported browsers: Microsoft Edge, Mozilla Firefox, Google Chrome, and Apple Safari. For the latest supported list, please visit the FIDO Alliance official website.
Recommended Execution Environment:
Windows | Chrome、Edge |
Linux | Firefox |
macOS | Safari |
Before using the FIDO authentication function, please complete the initialization process.
When using FIDO functions on a Mac, please close all the Blentity Manager. This will ensure the function operates correctly.
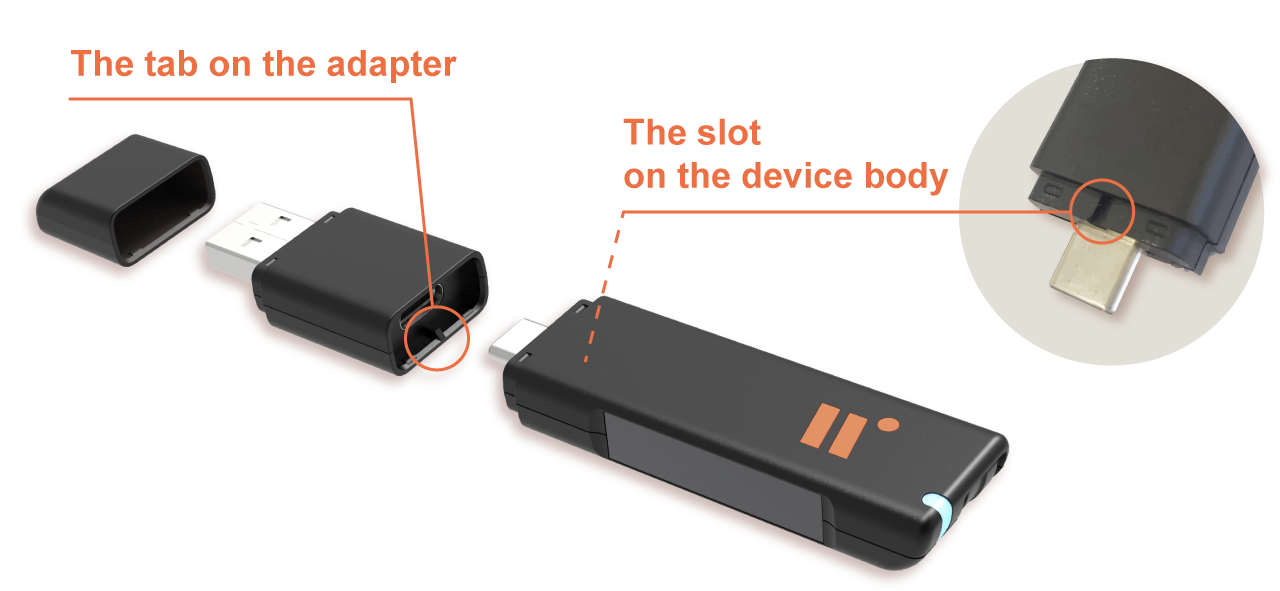
Hardware components
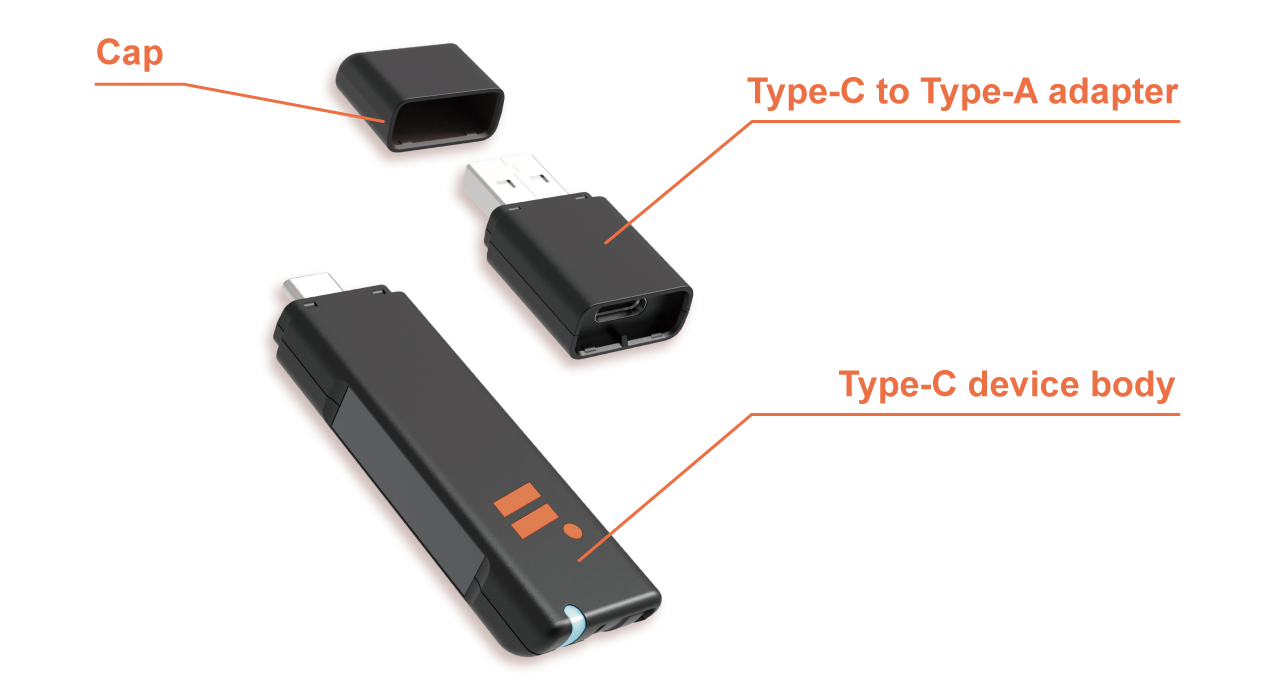
This product supports USB 3.0 data transfer speeds for efficient operation. To maintain these speeds, the main body of the device and the adapter must be connected in the correct orientation. Please carefully align the notch on the adapter with the groove on the device body to ensure a proper fit. An incorrect orientation will not allow a successful connection and may impede the device’s performance.
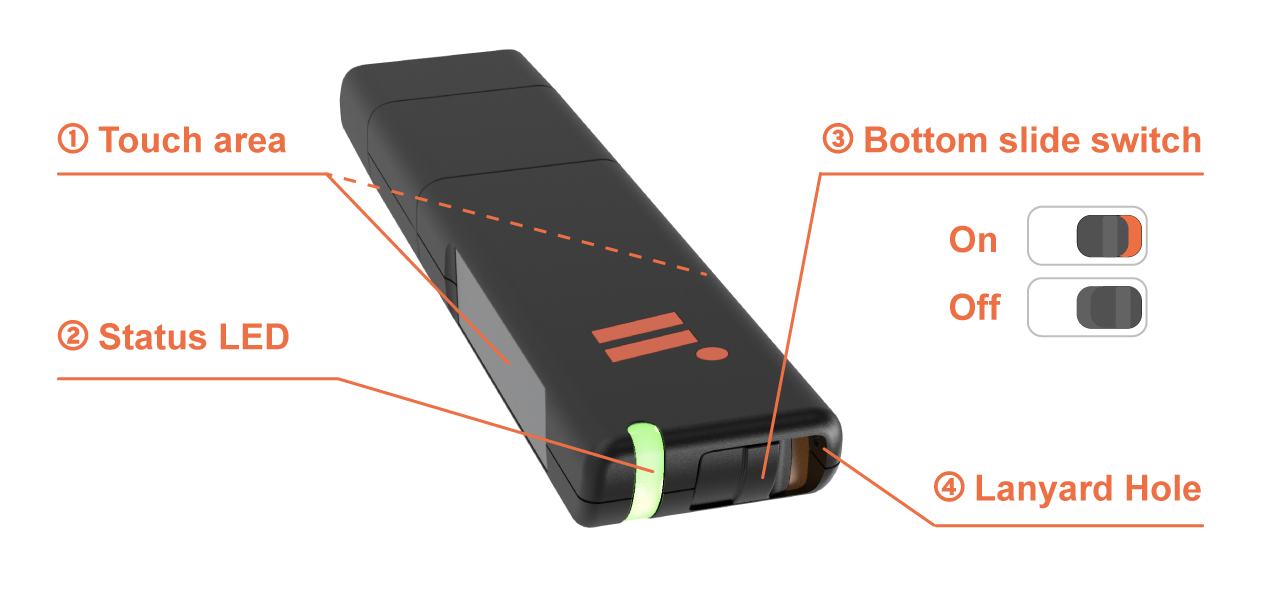
Touch Area
The metal areas on body sides of the body are equipped with touch sensors. When logging in, gently touch these metal areas with your finger as instructed to ensure that the authentication is performed by a real person, not remotely or by a robot. This mechanism is not fingerprint recognition and does not record any biometric data.
Status LED
Various device statuses, such as locking and unlocking the secure partition, are indicated through LED signals. Refer to the 1-5. Status LED List for more details.
Hardware Switch
The hardware switch is used to toggle between the following two modes:
Switch Status | Mode Description |
|---|---|
On | Enter operational mode. The product will open/close volumes according to your custom settings. |
Off | Enter pure authentication mode. Only FIDO authentication function can be used, and encrypted volumes can be opened using the management tool. Opening of system volumes and plaintext volumes is not supported, preventing volumes from popping up during authentication, which could interfere with the login process. |
After switching the toggle, you need to unplug and replug the device for the new mode to take effect.
4. Lanyard Hole
To avoid the loss of the device, it can be carried using a lanyard.
The following is ordered from highest to lowest priority according to the status indicators.
LED Status | Product Status |
Solid White | Device is powered on |
Solid Red | Not initialized, PIN locked, or device error |
Red Blinking | Partition opening or waiting for touch |
Solid Green | Secure partition is unlocked |
Green Blinking | File access within the secure partition is in progress |
Blue Blinking | Normal standby state (when no partitions are open) |
Purple Blinking | Normal standby state (other partitions except for the secure partition are open) |
Handling Solid Red Light Status
If the device has not been initialized, please refer to 2-4. Initialization to learn more.
If the PIN is locked, open Blentity Manager and follow the guide at the top of the homepage to enter your Passphrase and reset the PIN.
If the red light remains solid after excluding these two factors, it indicates a device malfunction. Please refer to other troubleshooting methods or contact the support center for assistance.
Appendix C:Safety Precautions
Please read the following carefully before use.
The following cautions and warnings include information to prevent harm to users and third parties and property damage.
Please understand and follow the instructions.
This item indicates that if the content in this category is ignored and mishandled, there is a risk of death or serious injury.
Do not use if smoking, odor, or unusual sounds occur
If smoking, emitting odors or making unusual sounds,
immediately remove the product from the computer.
Using it under abnormal conditions may result in malfunctions,
fires, electric shocks, and damage to the connected computer.
Do Not Disassemble Or Modify
Do not disassemble or modify the device, as it may cause malfunctions,
electric shocks, fires, and damage to the connected computer. If inspection,
adjustment, or repair is needed, please contact our support center.
Avoid Device Contact With Water
If water enters the device, promptly remove it from the computer.
Using it in wet conditions may result in malfunctions, fires, electric shocks,
and damage to the connected computer.
Avoid Use in Specific USB Ports
Avoid using USB ports that support power banks or fast charging,
as it may cause malfunctions and damage to the connected device.
This Product Contains Precision Parts; Please Be Mindful of The Following:
• Avoid dropping or applying heavy impact.
• Do not eat, smoke, etc., near the product during use.
• Do not forcibly bend, twist, bind, or clamp the interface.
• Do not place heavy objects or the device body on the interface.
• Do not damage the interface with staples, nails, etc.
• Do not forcefully insert into incompatible sockets or interfaces.
• Do not place the product where it may be stepped on may cause injury.
Do Not Touch the Device With Wet Hands
Avoid touching the device interface with wet hands, as it may result in electric shock, malfunctions, or damage to the connected computer host.
Stop using it if you experience any abnormal conditions
If your body experiences any abnormal reaction, please immediately cease using this product and consult a doctor.
Depending on the plastic materials used in the device, it may cause itching and allergic reactions.
Do not allow children or pets to use
Keep children and pets away from this device.
Ingesting small parts could lead to injury.
This item indicates that if the content in this category is ignored and mishandled, there is a risk of injury or property damage.
Avoid Use in Specific USB Ports
Avoid using USB ports that support power banks or fast charging, as it may cause malfunctions and damage to the connected device.
Regarding Product Placement, do not store or use this product in the following locations:
Places subject to vibration or impact
Areas exposed to direct sunlight
Humid or dusty environments
Areas with significant temperature variations
Proximity to heat-emitting objects (such as stoves, heaters, etc.)
Near objects emitting strong magnetic waves
(such as magnets, displays, speakers, radio transceivers, etc.)
Humid locations (kitchens, bathrooms, etc.)
Areas with corrosive gases in the atmosphere
(Cl2, H2S, NH3, SO2, NOx, etc.)
Locations with severe static electricity interference
Storage Method for Long Periods Of Non-use
When not using this product for an extended period, please remove it from the computer and cover it with the cap for proper storage.
When Moving Inserted Devices
When inserted into a device, such as a computer, please remove this product from the computer. It may cause malfunctions while plugged into a moving device.
Please Be Aware Of Static Electricity
Exercise caution regarding static electricity when in contact with this product. This product is a precision electronic device, and applying static electricity may result in product malfunctions.
Appendix D:Troubleshooting and Technical Support
If you encounter any of the following problems, please refer to the corresponding solutions.
Device Not Recognized by Computer
Connect the device directly to the computer's USB port, not through a USB hub.
After connecting, check if the status LED lights up.
Ensure the USB 3.0 port is securely connected and undamaged.
If the USB 3.0 interface card driver is outdated, please update it to the latest version.
Files Corrupted After Resuming from Sleep, Standby, or Hibernate Mode
Before entering sleep, standby, or hibernate mode in Windows or Mac, save your files and unplug the device to avoid corruption of files being accessed.
Forgotten PIN or Unable to Verify Successfully
First, check for typing errors.
If the PIN is forgotten or entered incorrectly more times than the limit, it will be locked. In this case, reset the PIN using the Passphrase generated during initialization.
If you have changed the FIDO PIN using a non-Blentity Manager tool, the PIN will be locked. If this occurs, open Blentity Manager and follow the instructions to reset your PIN.
Secure Partition Not Found in Slot
Please ensure that the encrypted partitions’ initialization and formatting are complete. After initialization, if formatting is not done, the secure partition will not be visible in the slot even after the correct unlock operation. Kindly go to 'Partition Management > Partition Setup' to allocate and format the space.
Screen Stops When Unlocking PIN with Passphrase
The key derivation process after entering the Passphrase takes about 10 seconds, but this may vary depending on your computer. Please wait patiently. If the wait exceeds one minute, don't hesitate to contact the support center.
Warranty
This product comes with a 1-year warranty service starting from the date of purchase. Warranty service cannot be provided for damages and malfunctions caused by abnormal use. If the product is damaged upon arrival, please contact us immediately for a replacement (excluding damaged packaging).
To assert your rights, please visit https://wisecure-tech.jp/warranty
Technical Support
Please submit problems through the "Contact Us" within Blentity Manager; the mail will automatically include the product serial number and version information. If it is beyond the warranty period, a quote will be provided based on the repair needs. Additionally, your authentication information and data may be at risk of deletion during repair and inspection, so please backup in advance.
Support Center
WiSECURE Technologies Corporation
Product Support Page: https://wisecure-tech.jp/products/samurai-key/support/
Customer Service Email: info@wisecure-tech.jp (Please contact us through the "Contact Us" feature within Blentity Manager to ensure we can quickly access your device information.)
Office Hours: 10:00ー17:00, Monday to Friday (excluding holidays)